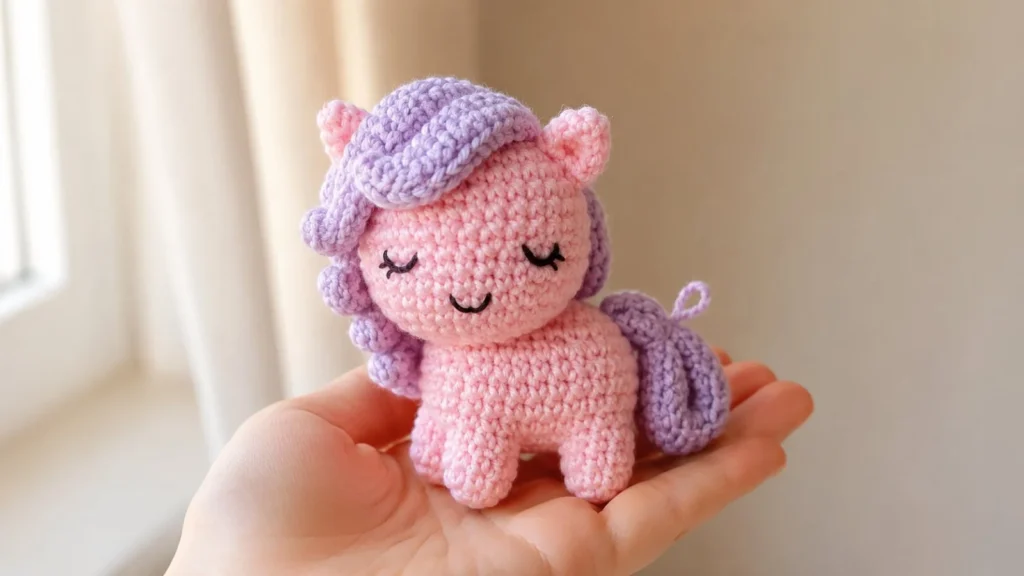
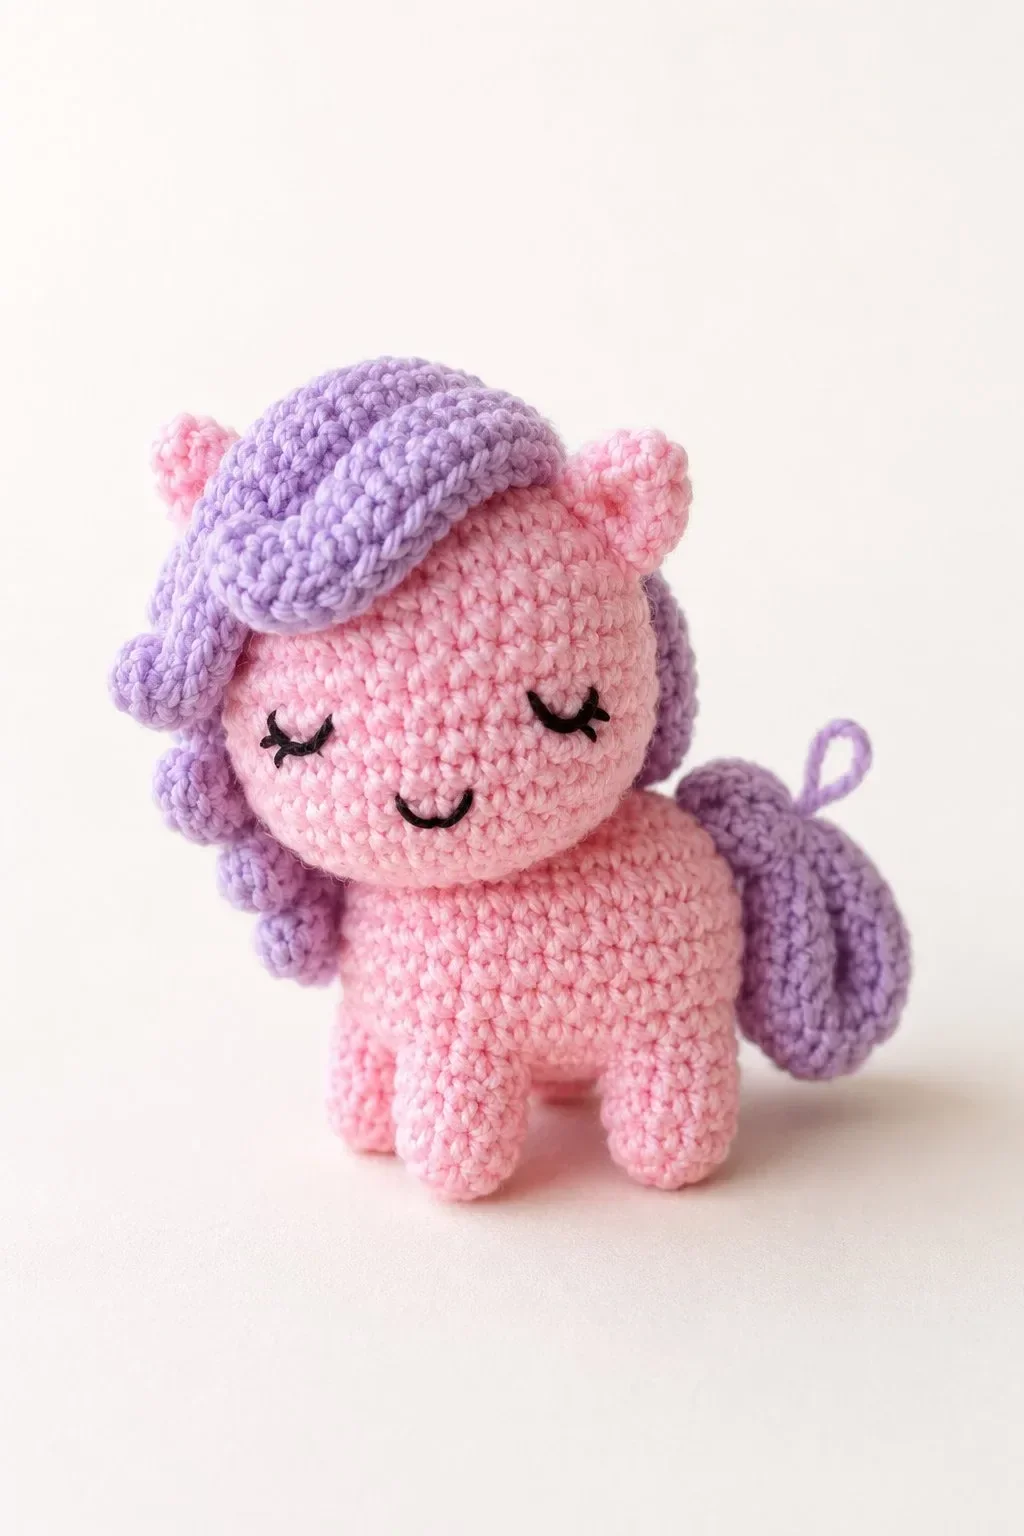
There is something extra charming about tiny crochet animals, especially when they fit perfectly in your hand. This Pocket Pony is soft, rounded, sleepy-eyed, and beginner-friendly enough for confident beginners who already know basic amigurumi stitches.
Made with a pastel pink body, a soft lavender mane, tiny ears, stubby legs, and a little yarn-loop tail detail, this pony is perfect as a handmade gift, nursery decoration, market item, or cute desk companion.
Pocket Pony Crochet Pattern Overview
Skill level: Beginner to easy intermediate
Crochet terms: US terms
Finished size: Around 10–12 cm tall, depending on yarn and hook size
Construction: Separate head, body, legs, ears, mane, and tail are crocheted, stuffed, and sewn together
Main techniques: Magic ring, single crochet, increase, invisible decrease, sewing amigurumi parts, simple embroidery
Materials You’ll Need
- DK or sport weight yarn in pastel pink
- DK or sport weight yarn in lavender
- Small amount of black embroidery thread for the eyes and smile
- 2.25 mm to 2.75 mm crochet hook
- Fiberfill stuffing
- Yarn needle
- Stitch marker
- Scissors
- Pins for assembly
- Optional: blush powder or pink embroidery thread for cheeks
Abbreviations
- MR: magic ring
- ch: chain
- st: stitch
- sl st: slip stitch
- sc: single crochet
- inc: increase, 2 sc in the same stitch
- dec: invisible decrease
- BLO: back loop only
- FO: fasten off
- R: round
- (…) x: repeat the instructions inside brackets
Pattern Notes
Work in continuous rounds unless stated otherwise. Use a stitch marker to mark the first stitch of each round.
Stuff the pieces firmly, but not so much that the stitches stretch. The pony should stay soft and rounded.
For a cleaner amigurumi finish, use an invisible decrease. Keep your stitches tight enough so the stuffing does not show through.
Pocket Pony Crochet Pattern
Head
Use pastel pink yarn.
R1: 6 sc in MR.
R2: inc around. 12 sts
R3: (sc, inc) x6. 18 sts
R4: (2 sc, inc) x6. 24 sts
R5: (3 sc, inc) x6. 30 sts
R6: (4 sc, inc) x6. 36 sts
R7–R12: sc around. 36 sts
R13: (4 sc, dec) x6. 30 sts
R14: (3 sc, dec) x6. 24 sts
R15: (2 sc, dec) x6. 18 sts
Start stuffing the head.
R16: (sc, dec) x6. 12 sts
R17: dec around. 6 sts
FO, close the hole, and weave in the end.
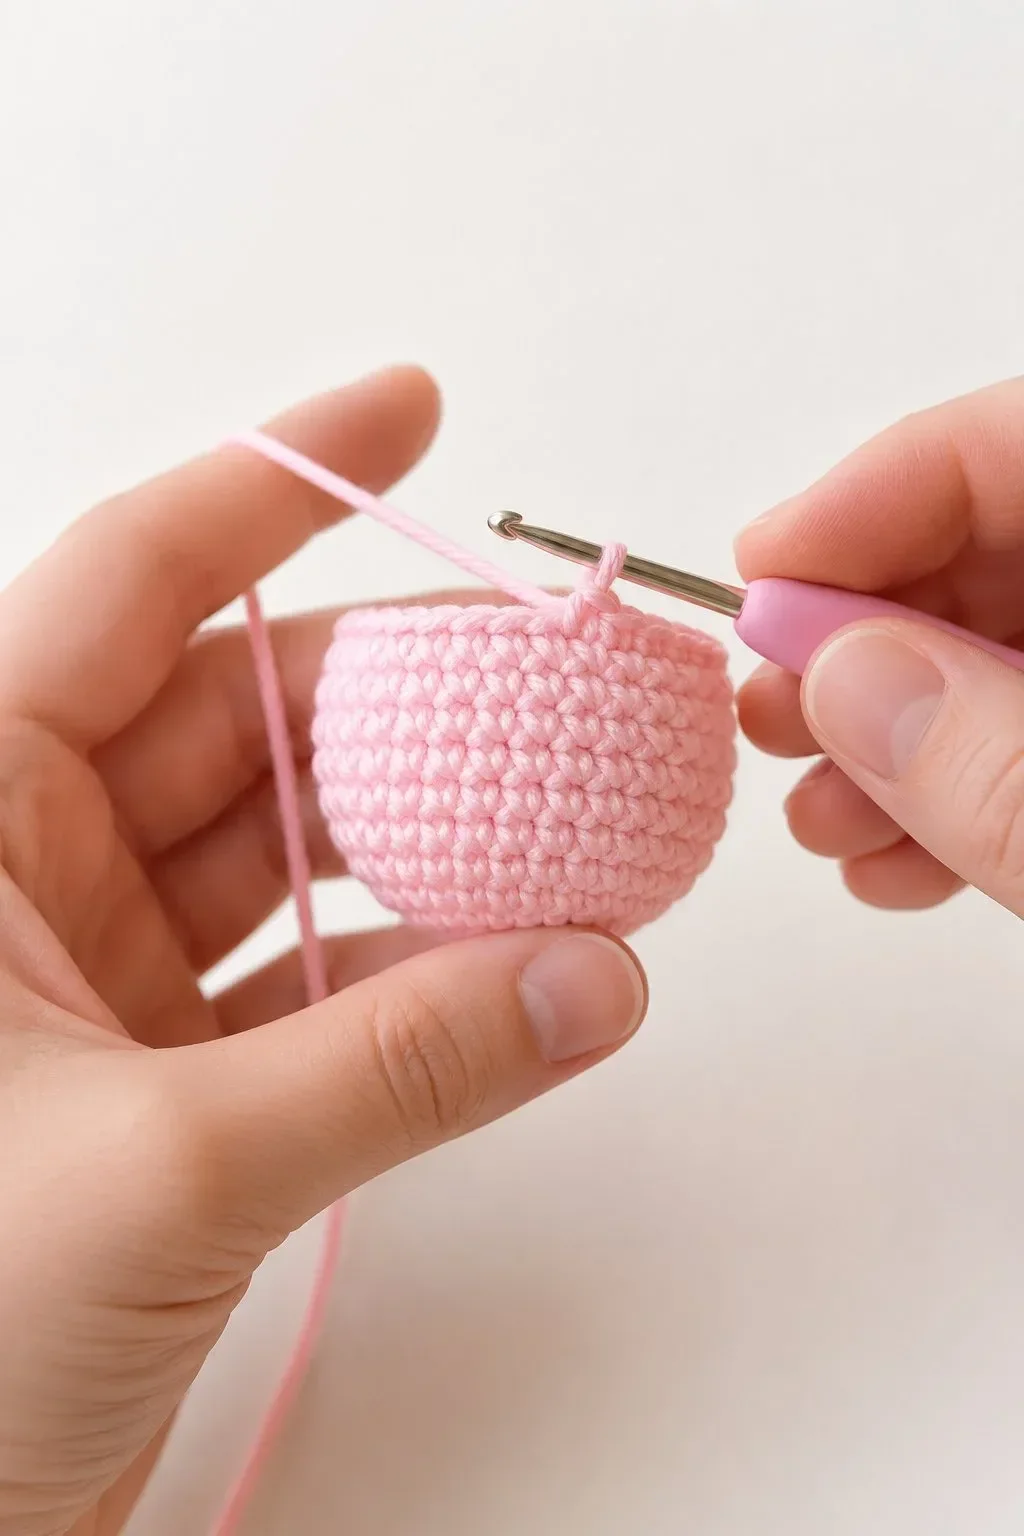
Body
Use pastel pink yarn.
R1: 6 sc in MR.
R2: inc around. 12 sts
R3: (sc, inc) x6. 18 sts
R4: (2 sc, inc) x6. 24 sts
R5: (3 sc, inc) x6. 30 sts
R6–R11: sc around. 30 sts
R12: (3 sc, dec) x6. 24 sts
R13: (2 sc, dec) x6. 18 sts
Stuff the body firmly.
R14: (sc, dec) x6. 12 sts
R15: dec around. 6 sts
FO, close the hole, and weave in the end.
The body should look like a soft oval shape. It will sit horizontally under the head.
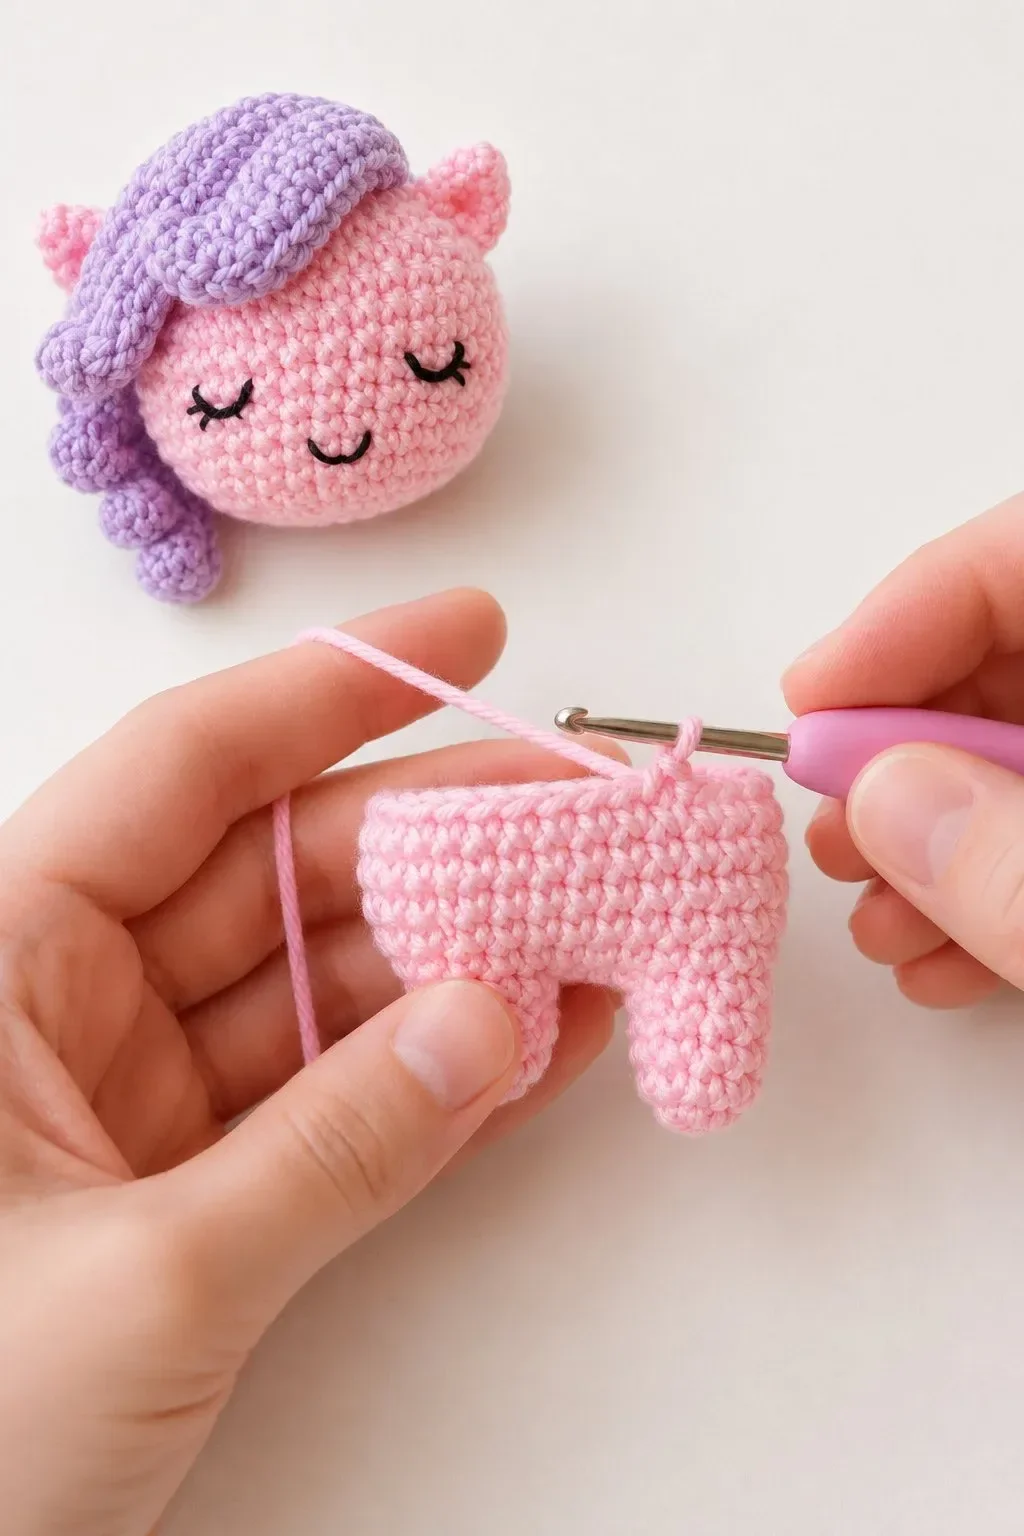
Legs — Make 4
Use pastel pink yarn.
R1: 6 sc in MR.
R2: inc around. 12 sts
R3–R5: sc around. 12 sts
R6: (sc, dec) x4. 8 sts
Stuff the lower half of each leg lightly.
FO, leaving a long tail for sewing.
Do not overstuff the legs. They should be small, rounded, and slightly stubby.
Ears — Make 2
Use pastel pink yarn.
R1: 4 sc in MR.
R2: (sc, inc) x2. 6 sts
R3: (2 sc, inc) x2. 8 sts
R4: sc around. 8 sts
FO, leaving a long tail for sewing.
Flatten each ear slightly. Do not stuff.
Forelock Mane
Use lavender yarn.
This is the soft piece that sits over the pony’s forehead.
Ch 9.
Row 1: Starting in the second ch from hook, sc across. 8 sts
Row 2: ch 1, turn, sc in BLO across. 8 sts
Row 3–Row 8: Repeat Row 2.
FO, leaving a long tail for sewing.
This creates a small ribbed panel. Sew it gently across the front top of the head so it curves like a soft fringe.
Side Mane Curls
Use lavender yarn.
Make 3 small curls.
Ch 12.
Starting in the second ch from hook, work 2 sc in each chain across.
FO, leaving a tail for sewing.
Repeat until you have 3 curls. Sew them to one side of the head, under the forelock, so they hang beside the pony’s face.
For a fuller mane, make 4 curls instead of 3.
Tail
Use lavender yarn.
R1: 6 sc in MR.
R2: inc around. 12 sts
R3: (sc, inc) x6. 18 sts
R4–R7: sc around. 18 sts
R8: (sc, dec) x6. 12 sts
Stuff lightly.
R9: dec around. 6 sts
FO, close the hole, and leave a long tail for sewing.
Optional Tail Loop
To create the cute little loop detail:
Attach lavender yarn to the top of the tail, ch 8, then sl st back into the same area. FO and weave in the ends securely.
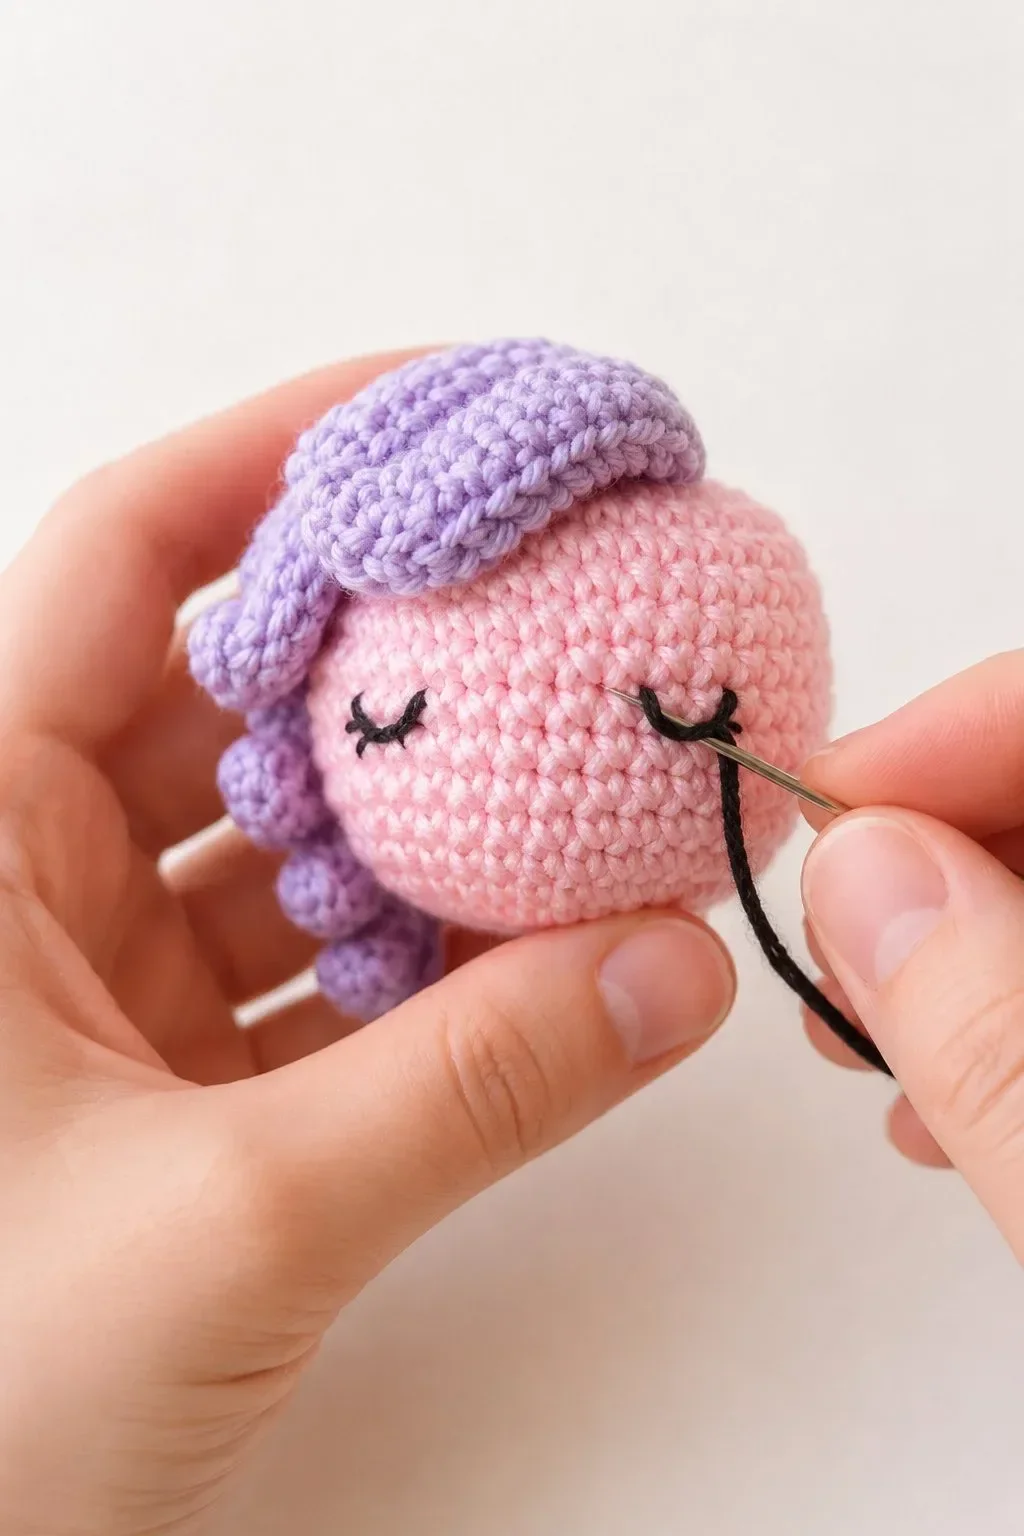
Embroidering the Face
Use black embroidery thread.
Place the sleepy eyes between R10 and R12 of the head, about 6–7 stitches apart.
For each eye, embroider a soft curved line like a small smile facing downward. Add two or three tiny lashes at the outer edge.
For the mouth, embroider a small curved smile between the eyes, slightly lower.
Keep the face simple. The charm of this pony comes from the soft sleepy expression.
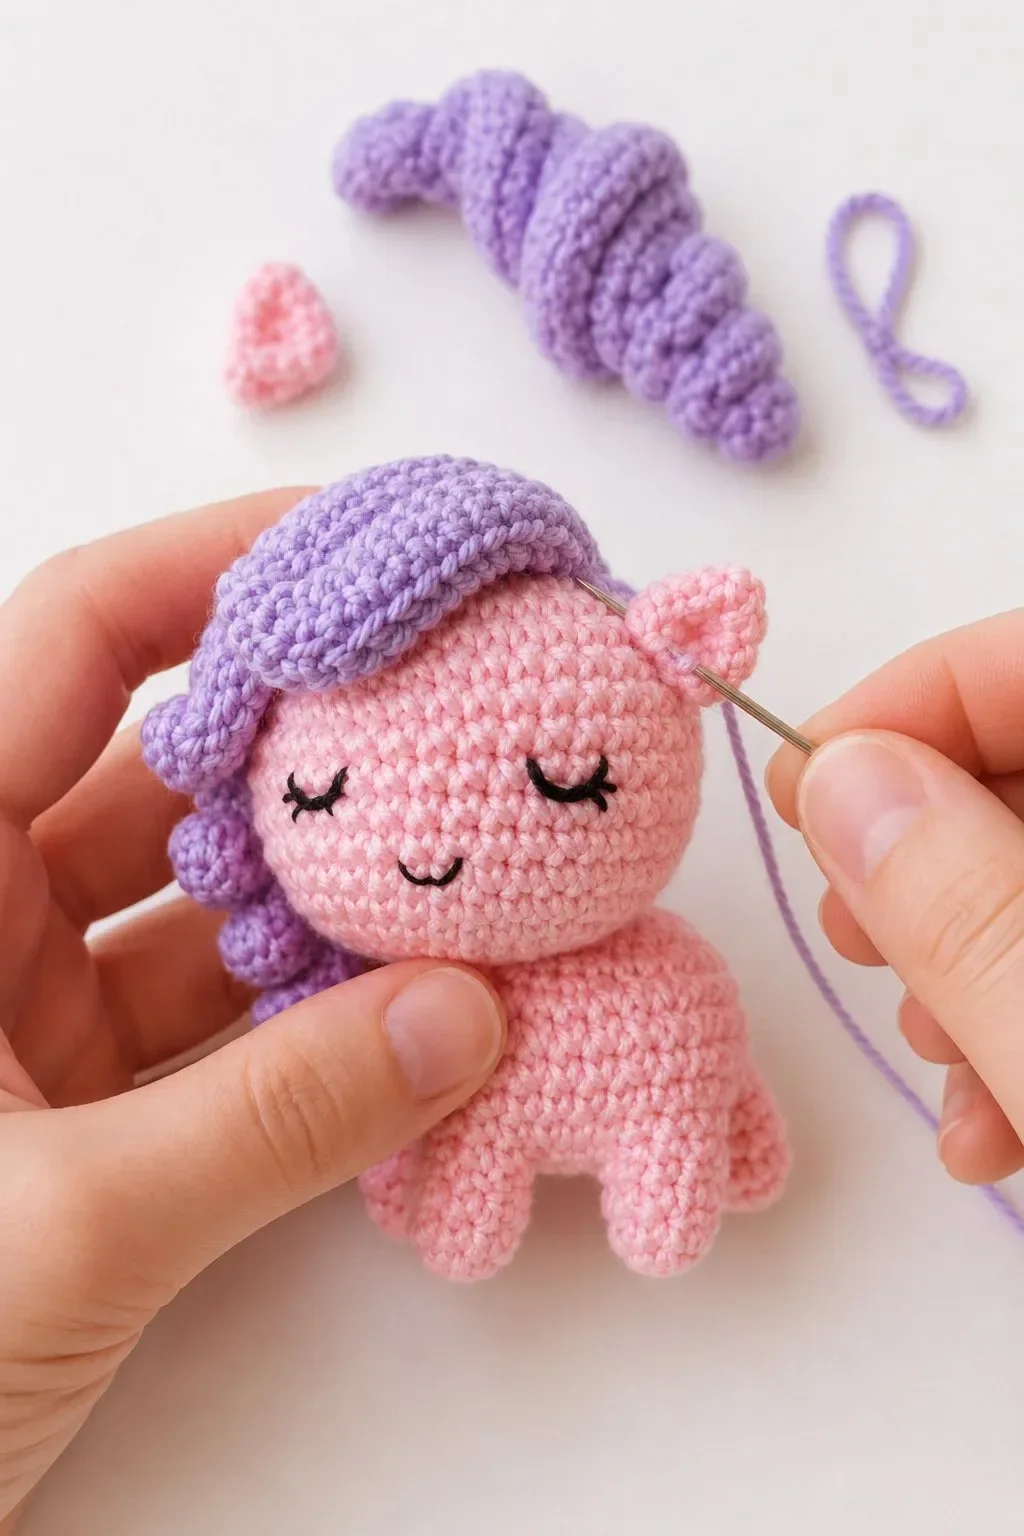
Assembly Instructions
1. Attach the Head to the Body
Position the head slightly toward the front of the body. Pin it in place first to check the balance.
Sew around the base of the head several times until secure.
2. Attach the Legs
Place two legs near the front underside of the body and two legs near the back underside.
The legs should be short and close together, giving the pony a cute standing pose.
Sew each leg firmly to the body.
3. Attach the Ears
Place the ears on the top sides of the head, slightly behind the forelock area.
Sew them down securely, keeping them small and rounded.
4. Attach the Mane
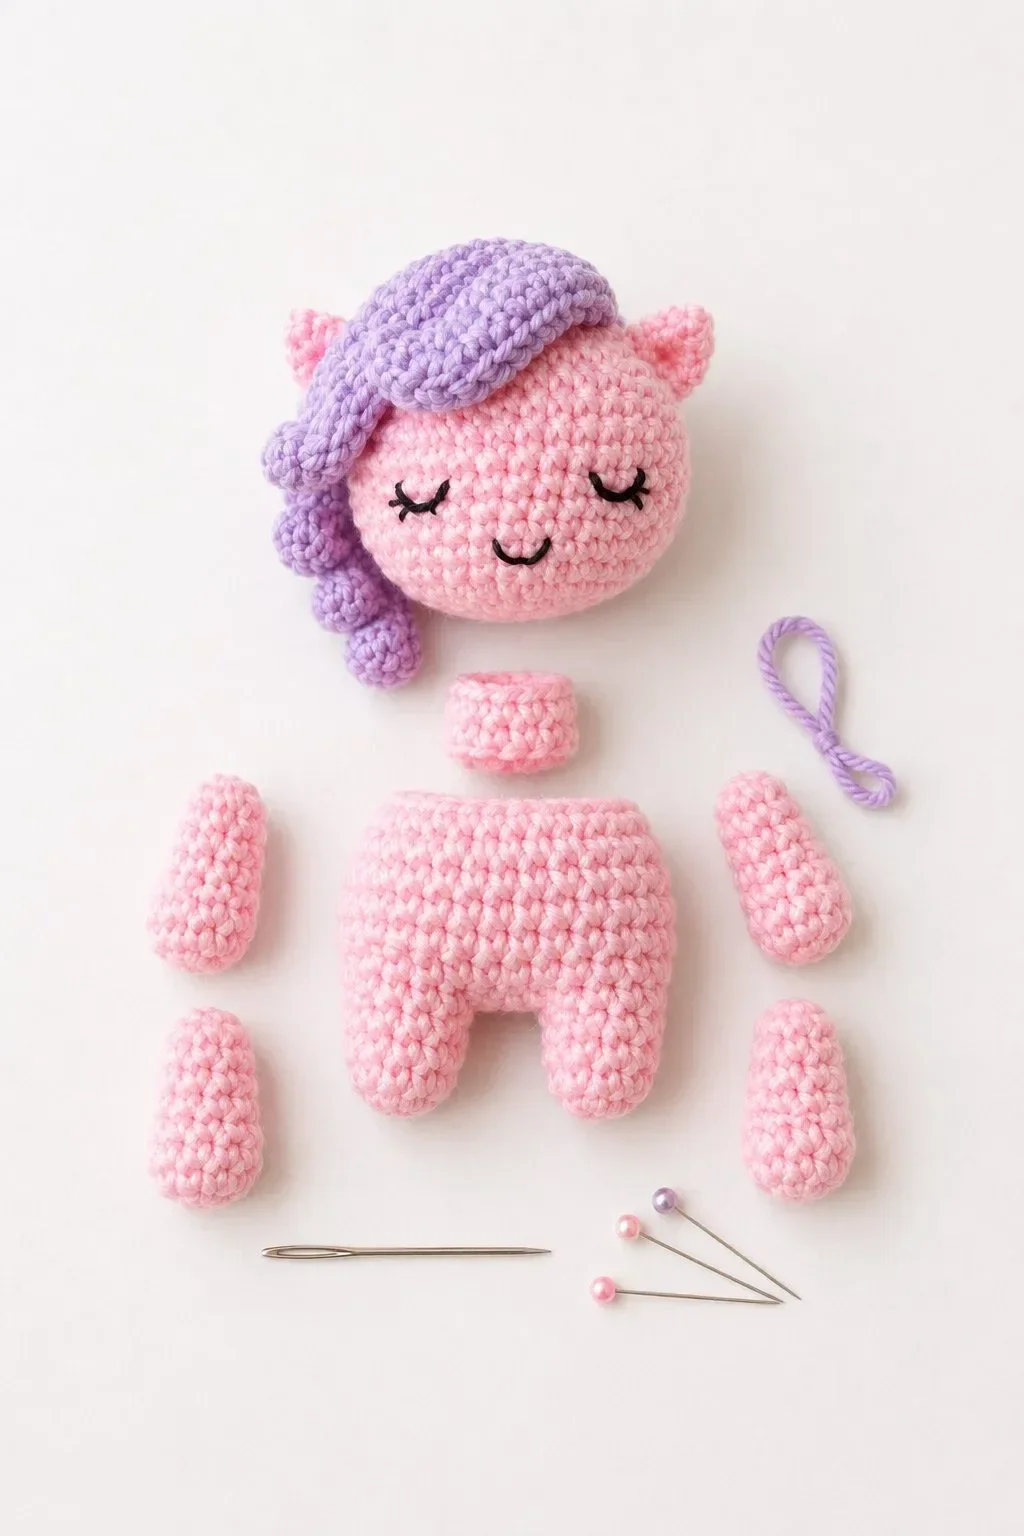
Sew the ribbed forelock across the top front of the head.
Then attach the side curls along one side of the head and neck. Let them curve naturally.
5. Attach the Tail
Sew the lavender tail to the back of the body.
Angle it slightly upward for a playful look.
6. Final Shaping
Use your hands to gently shape the head, body, legs, mane, and tail.
Add more stitches if any part feels loose.
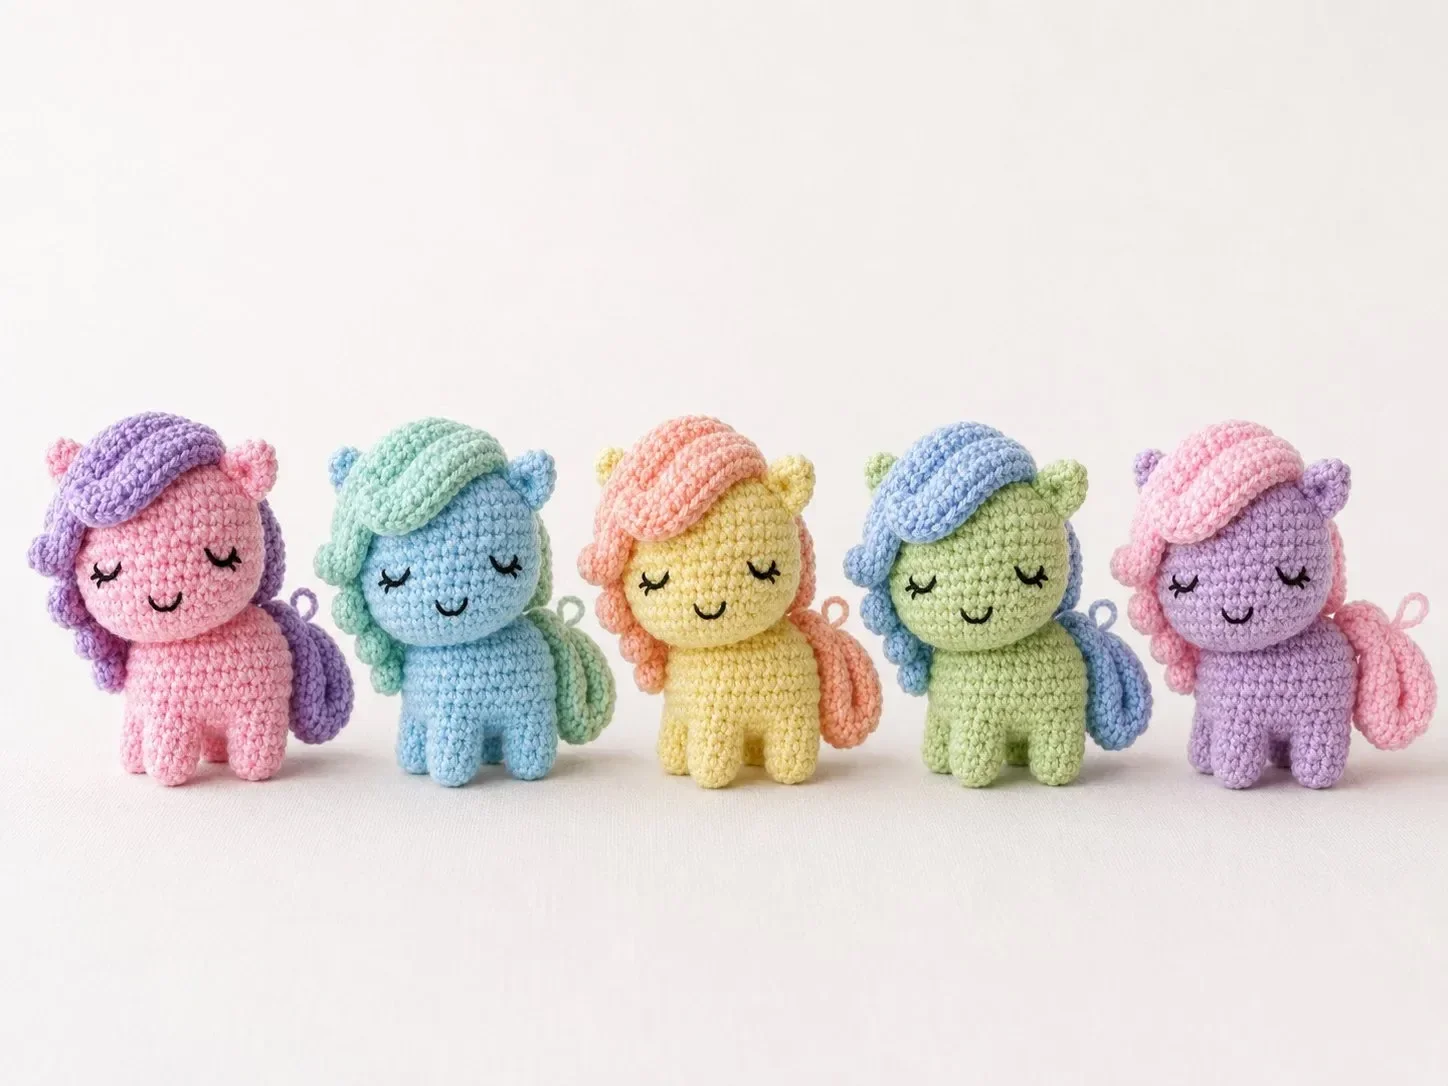
Color Variation Ideas
This Pocket Pony looks beautiful in soft pastel combinations. Try:
- Pink body with lavender mane
- Blue body with mint mane
- Yellow body with peach mane
- Green body with baby blue mane
- Lavender body with pink mane
You can also make a full pastel pony collection for gifts, craft fairs, or nursery decor.
![Pocket Pony Color Variations Image Placeholder]
Helpful Tips for a Cleaner Finish
Use a smaller hook than your yarn label recommends. This keeps the stitches tight and prevents stuffing from showing.
Pin all pieces before sewing. This helps you check the pony’s balance and expression before making anything permanent.
Keep the embroidery soft and minimal. Large eyes or heavy details can change the gentle sleepy look.
Stuff the head more firmly than the body. This helps the pony keep its rounded shape.
Use the same yarn weight for all parts so the proportions stay consistent.
Frequently Asked Questions
Is this Pocket Pony crochet pattern beginner-friendly?
Yes. This pattern uses basic amigurumi stitches like single crochet, increase, and decrease. The main challenge is sewing the small pieces together neatly.
Can I make this pony with plush yarn?
Yes, but the pony will become much larger. If using plush yarn, use a larger hook and adjust the eye embroidery placement as needed.
Can I use safety eyes instead of embroidered eyes?
You can, but embroidered sleepy eyes match the soft handmade style better. Safety eyes will give the pony a more toy-like expression.
How do I make the pony smaller?
Use thinner yarn and a smaller hook. Cotton sport yarn with a 2 mm hook will create a smaller pocket-sized pony.
How do I make the mane fuller?
Add more crochet curls, or make each curl longer by chaining 14–16 instead of 12.
Is this pattern no-sew?
No. This version uses sewn pieces because it gives better control over the pony’s shape and makes it easier for beginners to assemble cleanly.
Final Thoughts
This Pocket Pony is the kind of crochet project that feels simple, sweet, and satisfying from start to finish. The rounded body, tiny legs, sleepy embroidered eyes, and soft lavender mane give it a gentle handmade personality.
Once you make one, it is easy to create a whole pastel collection in different colors. They make beautiful small gifts, nursery decorations, keychain-style plushies, or craft market items.
Whether you choose classic pink and lavender or create your own soft color palette, this little pony is a lovely project for anyone who enjoys cute, beginner-friendly amigurumi.