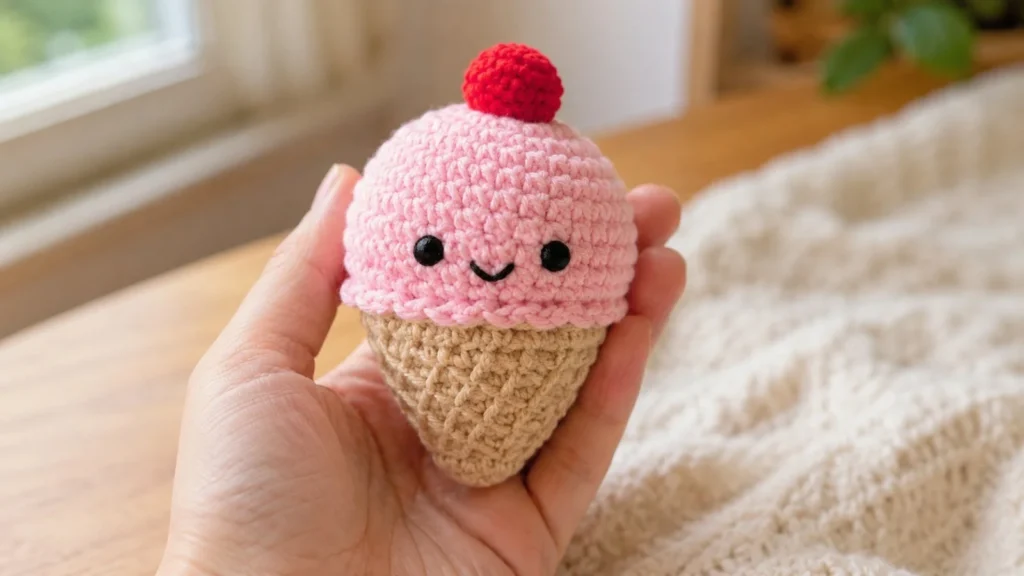
This No-Sew Mini Stress Ball Buddies Ice Cream Cone Crochet Pattern is a sweet, squishy, and beginner-friendly amigurumi project. With a soft cone base, rounded ice cream scoop, tiny smiling face, and a cute cherry on top, this little crochet ice cream buddy is perfect for gifting, desk decor, craft fairs, keychains, or a calming handmade stress ball.
The best part is that the cone, scoop, rim, and cherry are all worked directly onto the same piece. That means no sewing separate parts together. You only need to embroider the smile and weave in your yarn ends.
Why You’ll Love This Pattern
This mini ice cream cone is quick, cute, and very satisfying to make. It has the rounded shape of a stress ball but still looks like a tiny dessert friend. The soft scoop gives it a playful kawaii look, while the cone base makes it easy to hold.
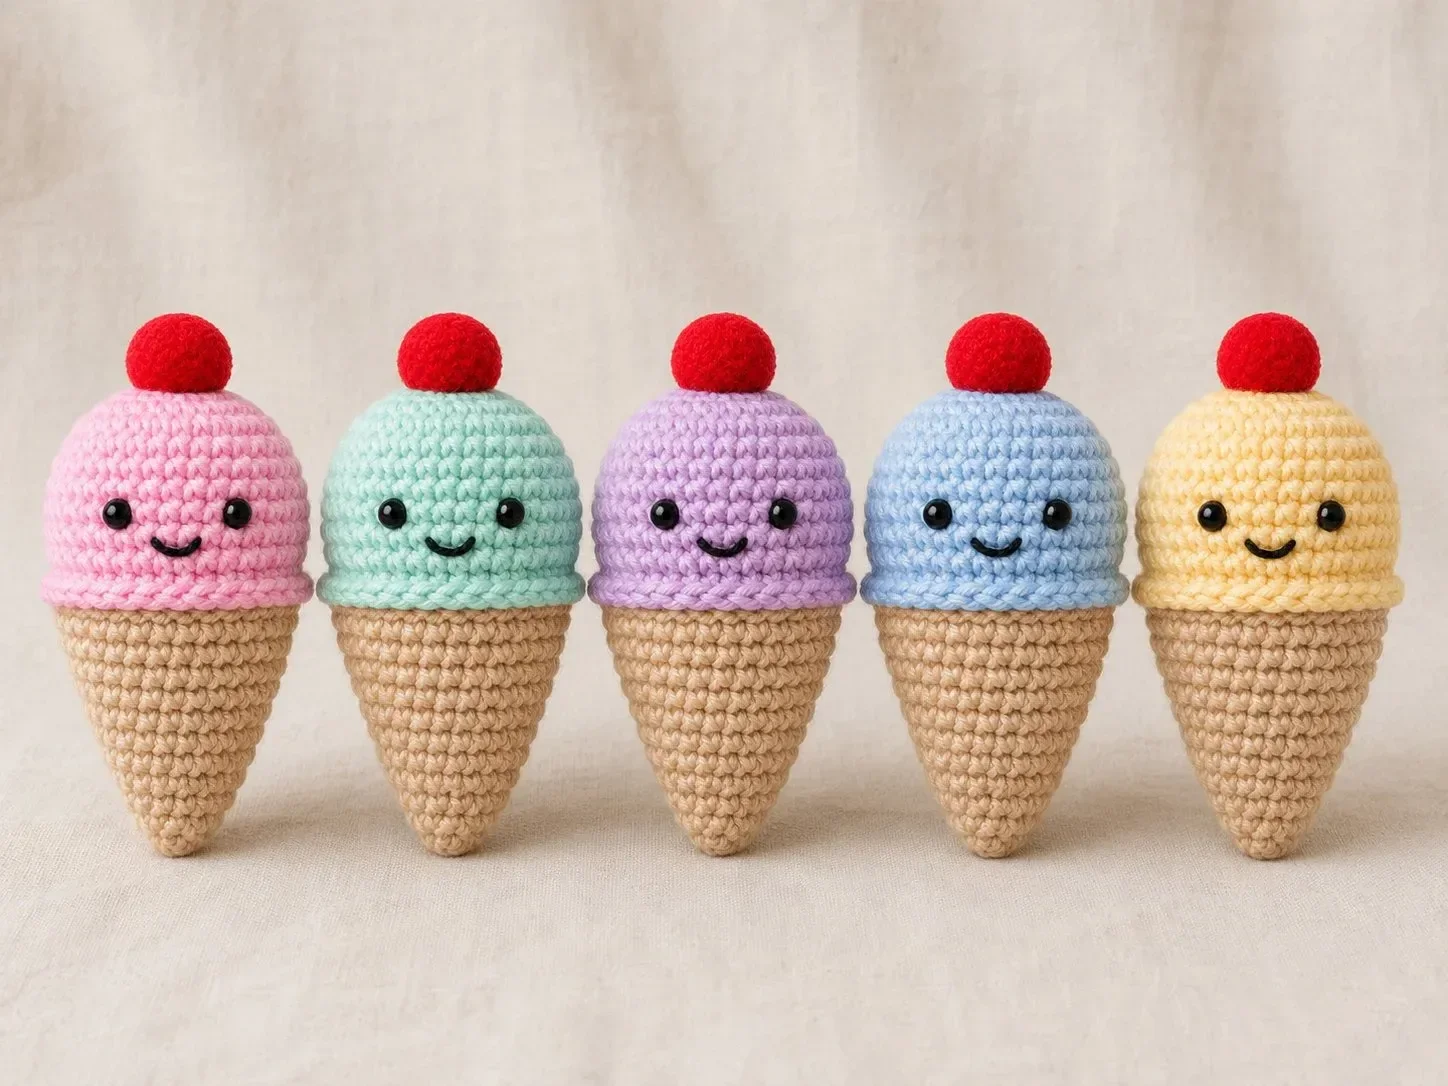
You can make one in classic pink strawberry, or create a full set using mint, lavender, blue, yellow, and cream yarn. A row of colorful ice cream buddies looks adorable for summer markets, party favors, classroom gifts, or handmade toy collections.
Finished Size
The finished ice cream cone measures approximately 9–12 cm tall, depending on your yarn, hook size, and tension.
For a firmer mini stress ball, use cotton or acrylic yarn with dense stuffing. For a softer plush version, use chenille yarn and a larger hook.
Skill Level
Easy / confident beginner
You should know how to make:
- Magic ring
- Single crochet
- Increase
- Invisible decrease
- Slip stitch
- Basic color change
- Working in continuous rounds
- Simple embroidery
Materials Needed
- Beige or tan yarn for the cone
- Ice cream scoop color: pink, mint, lavender, blue, yellow, or cream
- Red yarn for the cherry
- Black embroidery thread or thin black yarn for the smile
- 2 black safety eyes, 6–8 mm
- Fiberfill stuffing or soft shredded foam for a stress-ball feel
- Crochet hook suitable for your yarn
- Stitch marker
- Yarn needle
- Scissors
For a baby-safe version, embroider the eyes instead of using safety eyes.
Abbreviations
This pattern uses US crochet terms.
- MR = magic ring
- ch = chain
- st = stitch
- sl st = slip stitch
- sc = single crochet
- inc = increase, 2 sc in the same stitch
- dec = invisible decrease
- BLO = back loop only
- FLO = front loop only
- FO = fasten off
Pattern Notes
Work in continuous rounds unless stated otherwise. Use a stitch marker to mark the first stitch of each round.
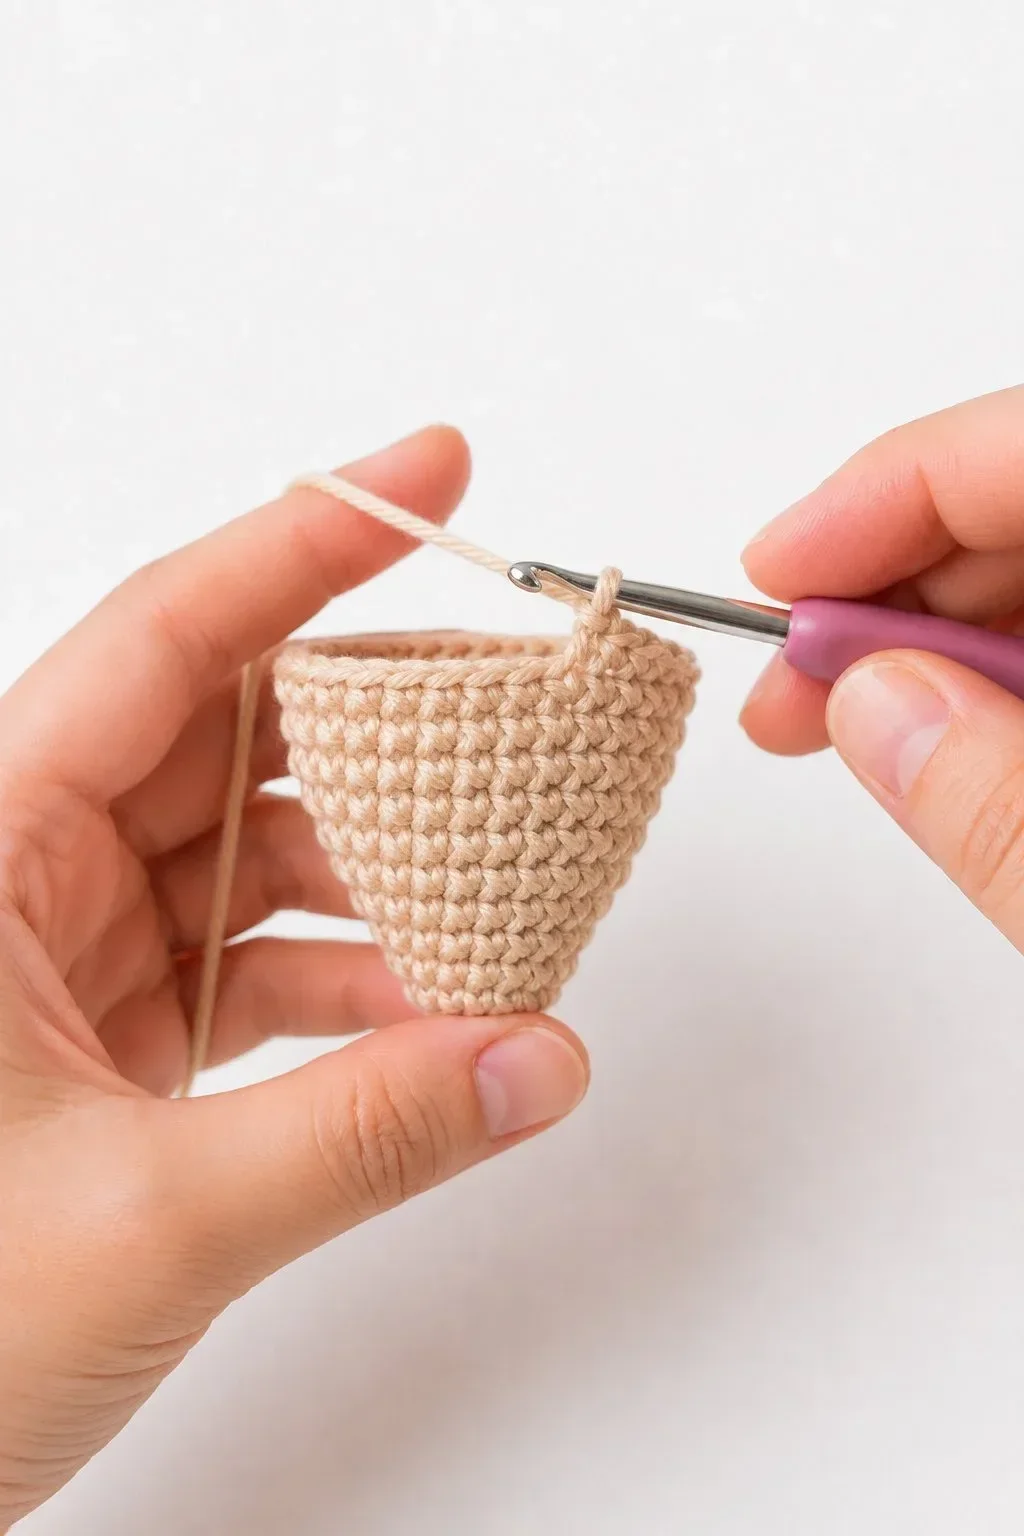
The cone starts at the bottom point and works upward. Then you change color and continue directly into the ice cream scoop. The decorative rim is worked into the front loops left at the color-change round. The cherry is crocheted directly onto the top, so there is no sewing.
Stuff firmly if you want the finished piece to feel like a mini stress ball. Do not overstuff so much that the stitches stretch open.
Crochet Pattern
Cone
Use beige or tan yarn.
Round 1: MR, 6 sc.
6 sts
Round 2: sc around.
6 sts
Round 3: (sc 1, inc) x3.
9 sts
Round 4: sc around.
9 sts
Round 5: (sc 2, inc) x3.
12 sts
Round 6: sc around.
12 sts
Round 7: (sc 3, inc) x3.
15 sts
Round 8: sc around.
15 sts
Round 9: (sc 4, inc) x3.
18 sts
Round 10: sc around.
18 sts
Round 11: (sc 5, inc) x3.
21 sts
Round 12: sc around.
21 sts
Round 13: (sc 6, inc) x3.
24 sts
Round 14: sc around.
24 sts
Round 15: (sc 7, inc) x3.
27 sts
Round 16: (sc 8, inc) x3.
30 sts
Stuff the cone lightly. Keep the bottom point shaped neatly.
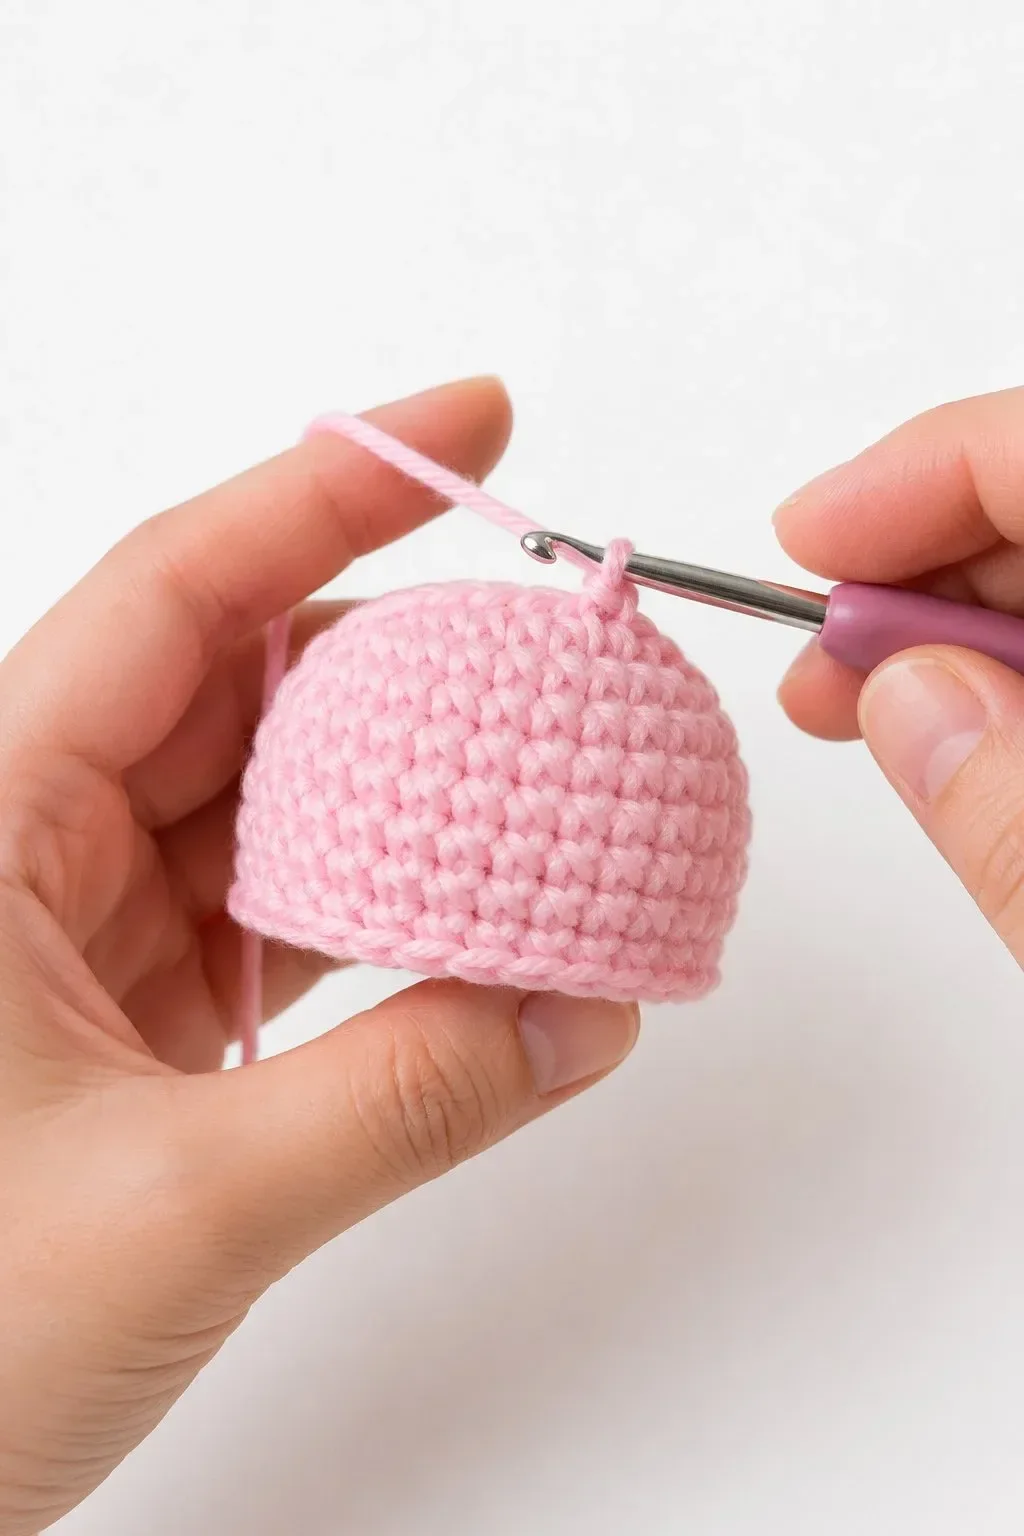
Ice Cream Scoop
Switch to your scoop color, for example pink.
Round 17: BLO sc around.
30 sts
This round creates the base where the decorative ice cream rim will be added later.
Round 18: (sc 4, inc) x6.
36 sts
Round 19: (sc 5, inc) x6.
42 sts
Rounds 20–25: sc around.
42 sts
Insert safety eyes between rounds 21 and 22, about 7–8 stitches apart. Make sure the face is centered on the front of the scoop.
Round 26: (sc 5, dec) x6.
36 sts
Round 27: (sc 4, dec) x6.
30 sts
Start stuffing the scoop firmly. Add enough filling to make it soft and squeezable.
Round 28: (sc 3, dec) x6.
24 sts
Round 29: (sc 2, dec) x6.
18 sts
Add more stuffing. Shape the scoop into a smooth dome.
Round 30: (sc 1, dec) x6.
12 sts
Round 31: dec around.
6 sts
FO, close the opening, and weave in the end.
Decorative Scoop Rim
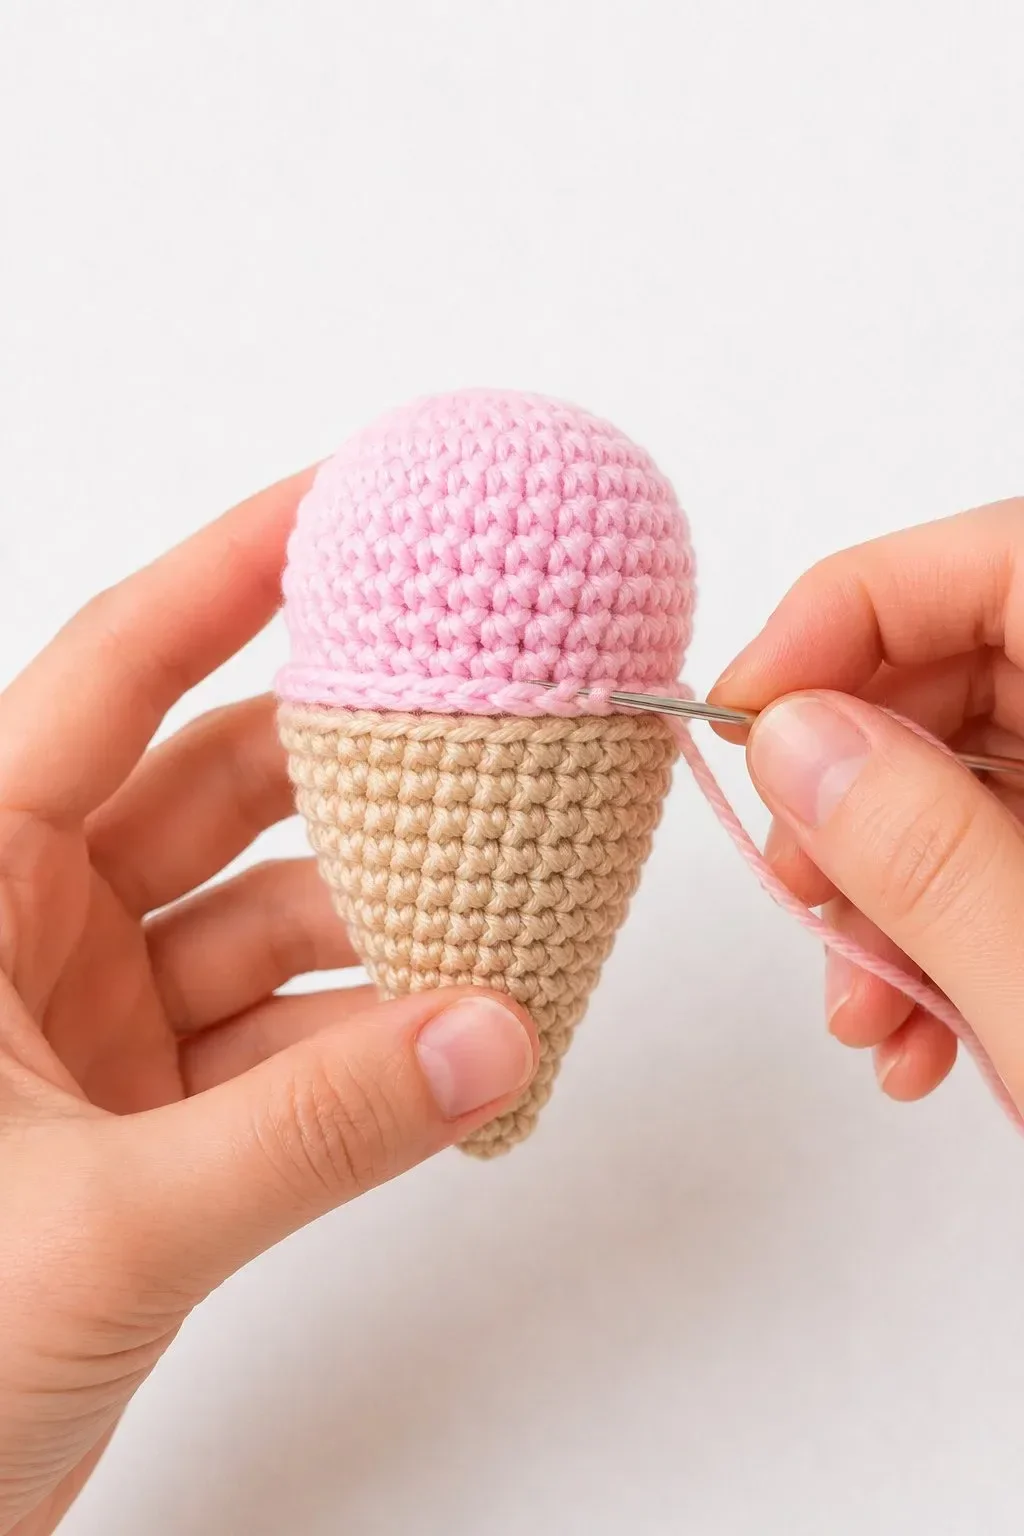
Turn the ice cream cone upside down so you can see the front loops left from Round 17.
Attach scoop-colored yarn to any front loop from Round 17.
Work the following around:
Rim Round: (sl st, ch 1) in each front loop around.
Sl st to join, FO, and weave in the end.
This creates a soft raised edge where the scoop meets the cone. You can also use crab stitch for a more twisted, rope-like rim.
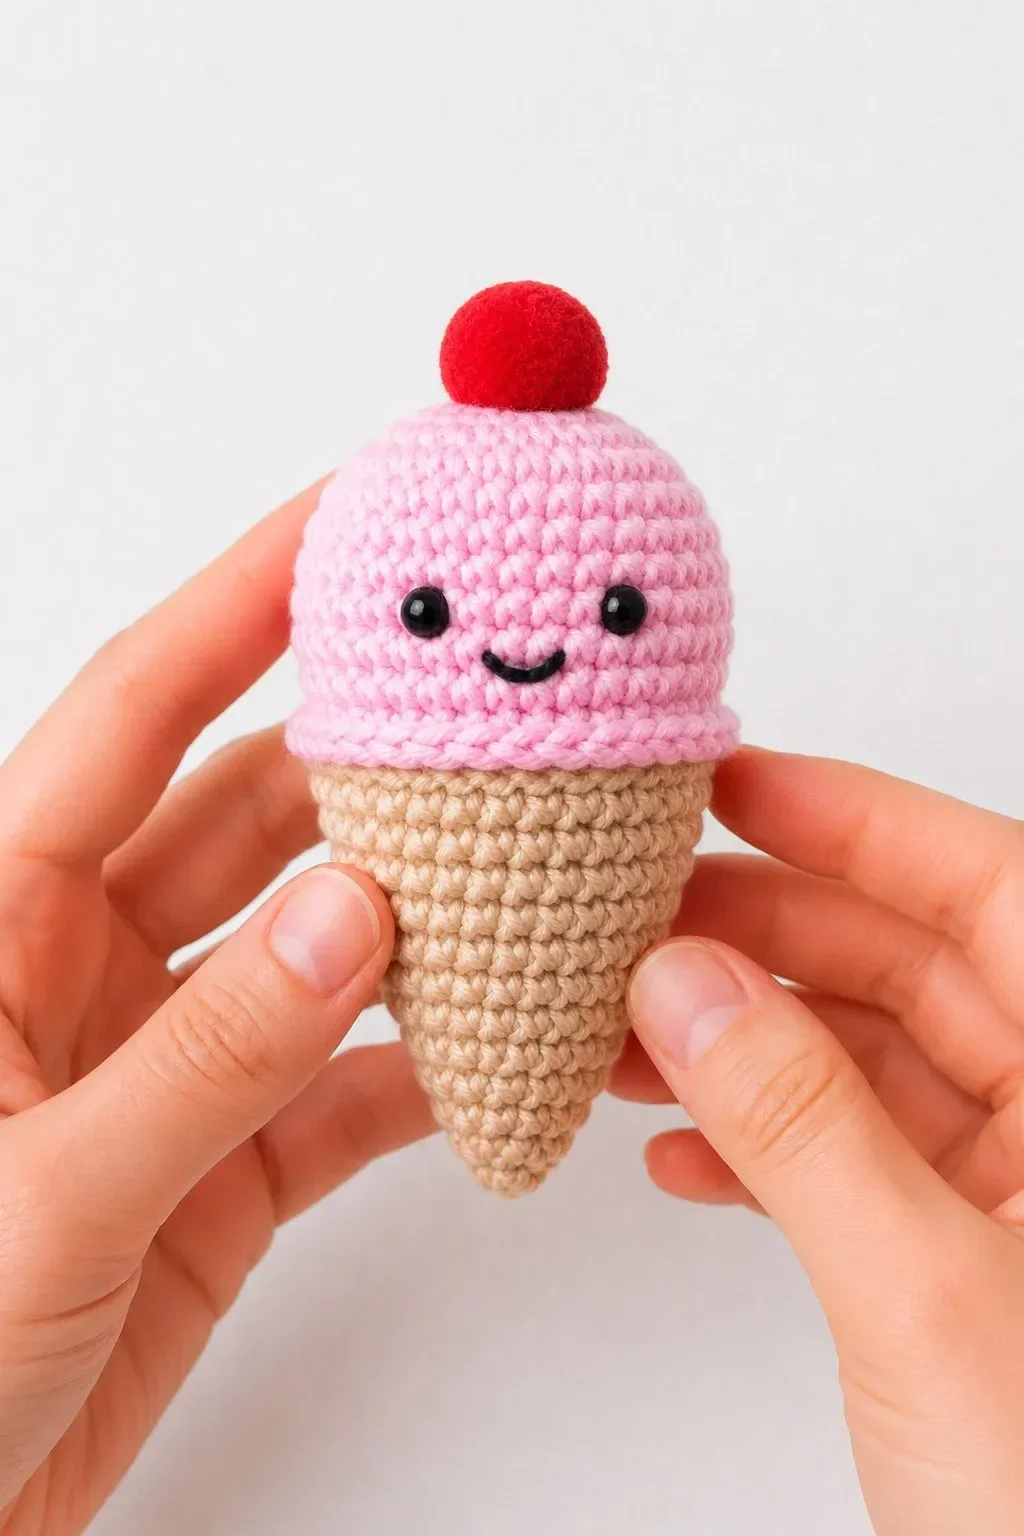
Cherry on Top
Use red yarn.
Attach red yarn directly to the top center of the scoop.
Round 1: Work 6 sc into the top center stitches.
6 sts
Round 2: inc around.
12 sts
Rounds 3–4: sc around.
12 sts
Lightly stuff the cherry.
Round 5: dec around.
6 sts
FO, close the opening, and weave in the end.
The cherry should sit like a small rounded ball on top of the scoop. Because it is crocheted directly onto the scoop, there is no sewing needed.
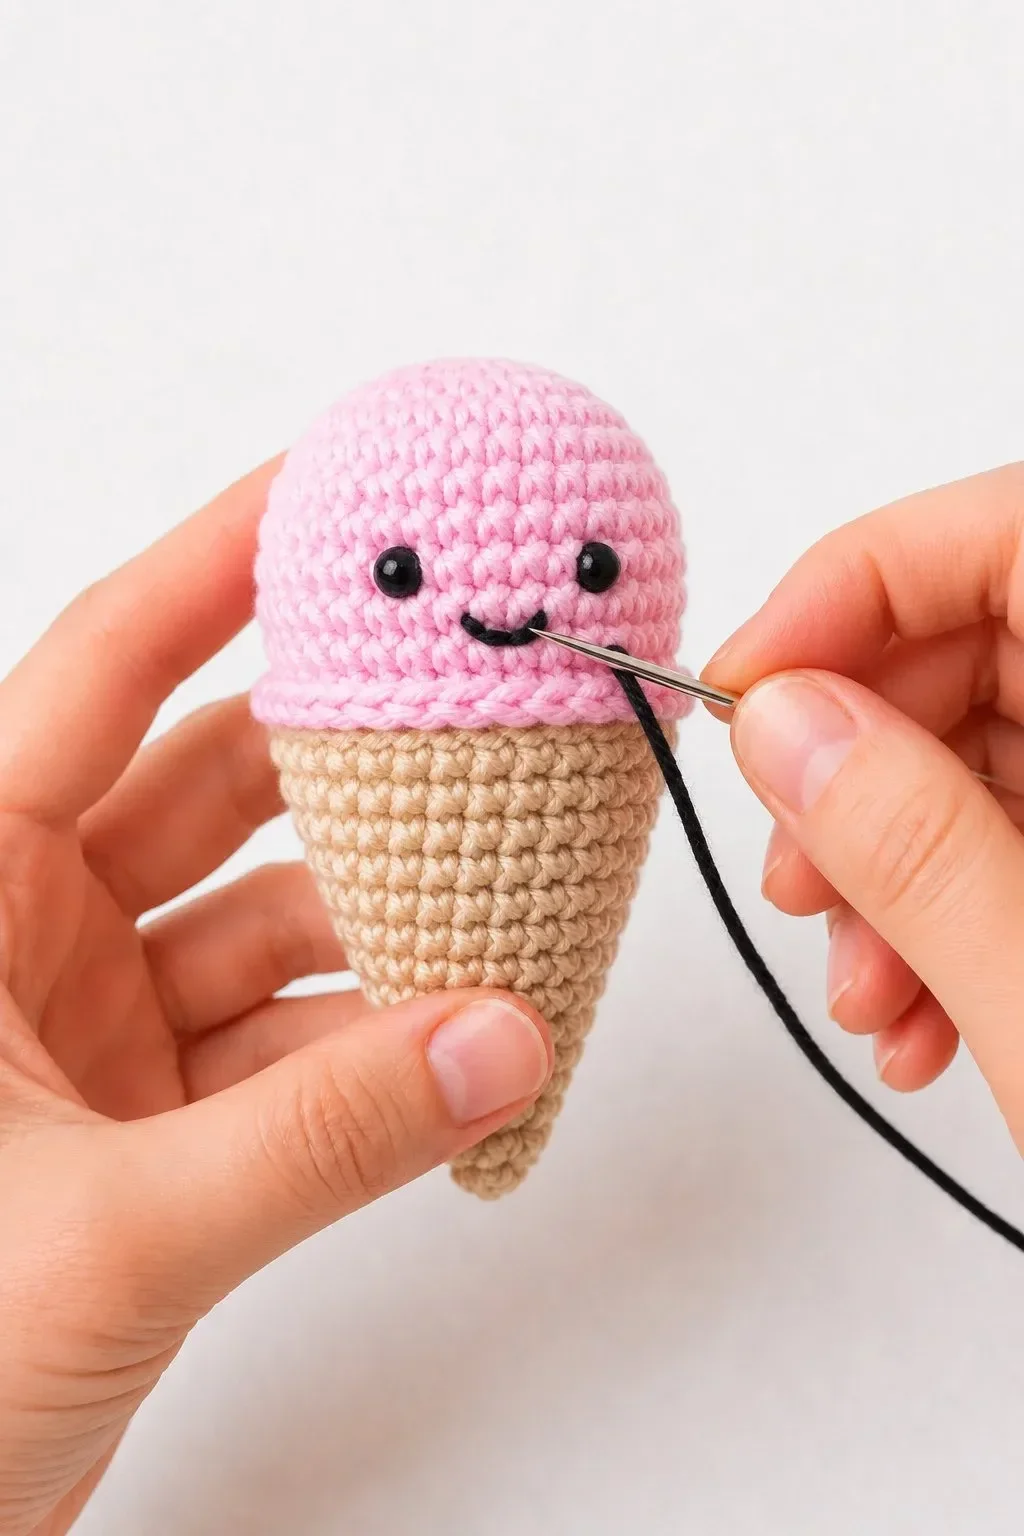
Smile
Use black embroidery thread or thin black yarn.
Embroider a small curved smile between the eyes. Keep it simple and centered. Secure the yarn inside the scoop and trim any excess.
For a softer kawaii expression, make the smile shallow and slightly curved upward.
Optional Waffle Cone Texture
To add a waffle-cone look, use a slightly darker tan yarn or embroidery thread.
Embroider diagonal lines across the cone in one direction, then add diagonal lines in the opposite direction to create a diamond pattern.
Keep the stitches loose enough so the cone can still be squeezed comfortably.
This step is optional, but it gives the cone more detail and makes the finished ice cream buddy look extra cute.
Filling Options for a Stress Ball Feel
For a soft squishy texture, use regular polyester fiberfill and pack it firmly.
For a slower, more stress-ball-like squeeze, use shredded memory foam inside a small fabric pouch before placing it inside the crochet piece.
Avoid loose rice, beads, or pellets if the toy is for children, because they can leak out if the stitches open.
Color Ideas
This pattern is perfect for making a full set of mini ice cream buddies.
Try these combinations:
- Pink scoop with red cherry for strawberry
- Mint scoop with red cherry for mint cream
- Lavender scoop with red cherry for berry vanilla
- Blue scoop with red cherry for cotton candy
- Yellow scoop with red cherry for lemon cream
- Cream scoop with red cherry for vanilla
You can also use brown yarn for a chocolate scoop or add tiny embroidered sprinkles with colorful thread.
Beginner Tips
Use a stitch marker for every round. This keeps the cone and scoop shape even.
Stuff the cone lightly and the scoop more firmly. The scoop is the main squishy part, so it should feel full but not stretched.
When changing from cone color to scoop color, pull the new yarn through on the final yarn-over of the last cone stitch. This creates a cleaner color transition.
Place the eyes before closing the scoop. Check the face from the front before locking the safety eye backs.
For the cherry, keep your stitches tight so the stuffing does not show through.
Make It Into a Keychain
To turn your mini ice cream buddy into a keychain, attach a small keyring to the top behind the cherry. Use strong thread or yarn and reinforce it through several stitches.
For keychains, cotton yarn works best because it holds its shape well and handles daily use better than very soft plush yarn.
Care Instructions
Spot clean gently with a damp cloth. If made with cotton or acrylic yarn, you can hand wash carefully in cold water.
Do not twist or wring the toy. Gently press it in a towel and allow it to air dry fully.
Avoid machine washing if the piece includes safety eyes, embroidered details, or foam filling.
Frequently Asked Questions
Is this pattern really no-sew?
Yes. The cone and scoop are worked as one continuous piece, the rim is crocheted directly into the front loops, and the cherry is crocheted directly onto the top. You only need a yarn needle for weaving ends and embroidering the smile.
Can beginners make this ice cream cone?
Yes. This is a good project for beginners who already know how to crochet in the round, increase, decrease, and change colors.
Can I use plush yarn?
Yes. Plush yarn will make a bigger and softer ice cream buddy. Use a larger hook and bigger safety eyes.
Can I make it smaller?
Yes. Use thinner yarn and a smaller hook. Sport weight cotton with a 2 mm hook will create a tiny keychain-sized version.
Is this safe for babies?
Use embroidered eyes instead of safety eyes if making this for babies or toddlers. Also avoid loose pellet fillings.
Can I sell finished ice cream cones made from this pattern?
Yes, you can sell finished handmade ice cream buddies. Use your own photos for listings and product pages.
Final Thoughts
This No-Sew Mini Stress Ball Buddies Ice Cream Cone Crochet Pattern is cute, quick, and relaxing to make. The cone and scoop are simple, the face gives it personality, and the cherry on top adds the perfect playful finish.
Make one pink strawberry cone first, then try mint, lavender, blue, yellow, and cream to create a full collection of soft little ice cream friends.